Sunday, 28 March 2010

Truly distressing!


Hello again friends!

I have managed to get a smidgin' of time working on the slowly deteriorating '211' Doppelganger. I have added some more weld seams and 'tag' joints, by using some bright coloured stretched sprue, softened with Tamiya Extra Thin, and given a rippled and pitted relief to represent the texture of the welding. You will notice that I have also added some 'sprue' welding joints to the spare track clamps lower lugs. This is because the area is devoid of any Zimmerit due to the fire, and it will give the possibility of adding a very bright silver weld to mix of the melted paint, charred Zimmerit and heated, rusted armour plate.


One shadowy area of Zimmerit that I have not pasted onto the Tiger yet is the Bow Glacis Apron! "BGA"? I hear you say, well do you know that unlabelled piece of plate that adjoins the Bow plate, and the Glacis plate, that also forms the roof for the transmission? ... That's the BGA, or for want of an 'official term' what I call it.
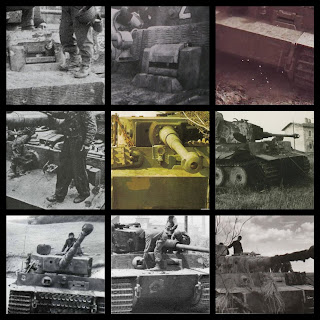
One major headache for modellers wanting to depict a Tiger 1 during it's production period that was 'covered' by Zimmerit application... Is to paste this area or not! Take a look at this collage of images that appear to show Zimmerit in place, or give a clear indication of an application of the ridged pattern. I personally believe that on the majority of Mid and Late Tiger 1's, that Zimmerit was applied here, and one of the main reasons that it can be difficult to observe, is due to the levels of overhead saturated light that would create difficulties in a period image being clear enough to discern whether, or whether not Zimmerit was applied. Allied also with acculmulated dirt and dust, and the passage of the crew over the easiest mounting point of the Tiger 1. 


Tricky eh? For this area I have experimented with a few various mediums and methods of applying the ridges. For this particular Tiger, I have dabbled with using good old 'Mr Surfacer' the modern wonder of the Armour Modelling world.
 I used the 1000' grade Mr Surfacer in a couple of coats that were 'flow' applied with a medium flat brush. This was then left to cure, for around ten-fifteen minutes, before the pattern of the smaller ridges with the indomitable Lion Roar Zimmerit Applicator tool. Surprisingly at no point did the Mr Surfacer stick to the rollers die. And in my opinion looks to be a fair representation of the Zimmerit on this much queried area of the Tiger.


So that is where we are up to on this dishevelled Tiger, the next logical step is to add the impact hits on the Mantlet and Glacis, along with the remnants of external fittings to the hull and turret.

 Thank you for taking the time to visit... Back real soon. Cheers Phil.

Monday, 22 March 2010


Good Morning Folks! Especially to my good friend Rob, and to Didier, good to hear from you both. I will post an abridged version of this Tiger over on the MIG forum shortly.
I have been having a bit of fun with the Zimmerit on '211', focusing mainly on the rear hull plate. If you look closely, you will notice that the actual Zimmerit in this area does not follow a uniform pattern. I believe this to be from stowage and confines not enabling the use of the standard (roller) applicator, and the 'spreader' at Kassel having to employ a different tool in order to imprint the ridges into the curing paste. Here is a little collage to illustrate the point.


Now by using a technical pencil to map the damage and paste areas, then by using the Lion Roar Zimmerit Applicator, and a 3mm Jewellers Flathead Screwdriver, I have applied the 'disrupted' pattern of the Zimmerit onto the flaking and scabrous rump of this once noble 'Big Cat'.
The sponson plates Zimmerit has been realised with just the Lion Roar Tool, though the pattern's most forward edge often has the 'trowelled' ridge where the Glacis plate meets the Sponson's plate.

Well the next logical step I suppose is the AP damage to the 'soft' area's on the Glacis plate and Gun Mantlet!

See you all later... Cheers for calling in. Phil.

Friday, 19 March 2010


Hello again! Sorry for the void between posts, and the slow response to comments... Not really au fait with the 'whole blog' thing yet!

There that's my grovelling apology over. And what have I been up to on the Tigers?
Well other than getting two builds going forwards (slowly) I have been spawning a wrecked Tiger of the s.SS.Pz.-Abt.101 of the 2nd Kompanie, that was originally from the 1st Kompanie, before the latters withdrawal from the Normandy theatre, in order to refit and train on the Tiger B.
This has come about due to Rob's (Scratchmods) enthusiasm for me to wreck a Tiger! So I had a look around for one that would spur me into a build and found this one...

Now this Tiger caused a lot of web traffic as it's tale began to be pieced together, by an amazing bunch of researchers over on Missing Lynx, and Forum.Axis History.

http://forum.axishistory.com/viewtopic.php?t=97516&highlight=

The work of guys like Yann Jouallt, Mike Kenny, Hartmutt v Holdt, Cyprek, etc fascinate me, always liked a good detective novel... And this stuff is better than Agatha Christie and Sir Arthur Conan Doyle's sleuth works.

So as a tribute to their efforts, (and Rob's patience) here we go...

I am once again using either DML #6253 or #6406! I tend to combine a lot of sprues from various DML Tigers together for space saving!!! The Zimmerit is applied with Tamiya's Smooth (white) Epoxy Putty, I use this due to it's long curing time, it's ability to be softened with gentle heat, and it has a stiffness to it that enable you to really impress the pattern into it, almost to the strenes surface, without 'splurge' between the rows, adding to the look akin to the actual Zimmerit seen on a Tiger's hide. For the pattern this was replicated using a Lion Roar Zimmerit 'roller' tool.
As you can see from the actual images of '211' it has taken a 'hell of a pasting'! I think for my first attempt at a 'Trashed Tiger' this one has got a bit of everything thrown at it! Impacts,fire damage,missing stowage,shattered Zimmerit, field repairs, and re-numbered to boot!
I have been having a good look at the rear of this unfortunate Tiger, and it appears to have possibly taken a lot of punishment to it's rear. I believe that it has the right exhaust assembly missing, except for the armoured cover. Maybe a round took it out or it was lost due to an explosion from within the engine compartment, as the fire damage is mainly to the rear right hand side portion of the Tiger. I have pasted up the flanks and bow plate of this Tiger, and will post some more later, as I want to experiment with something on the rear hull plate.

Thanks for stopping off... Back very soon. Cheers Phil.